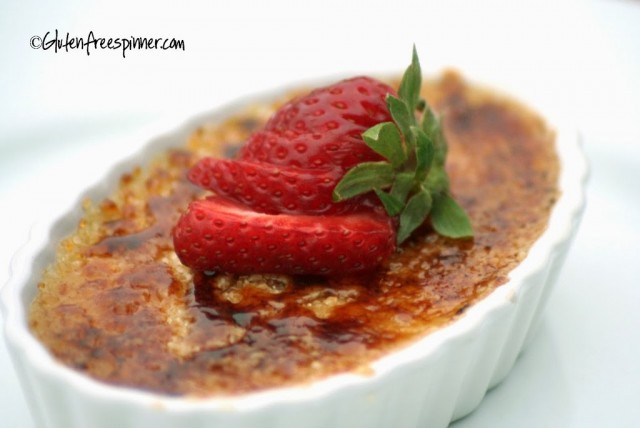
Creme Brulee
When you think of Creme Brulee you think of a special occasion, right? Me too.
And it is special…but once you learn how to make it, you’ll serve it for any occasion. And it gets the oooooh’s and aaaaah’s it deserves.
I watched a video by the French Culinary Institute where they showed step by step instructions. You can take the time to watch it before making, it really helped me, but I’ll list the instructions and my tips here as well.
The first time I made Creme Brulee it was spot-on and fabulous. The second time…well, let’s just say I presented my guests with liquid Creme Brulee. Ugh. I had no idea until they broke the crust…and whaaalaaa…creamy milkshake. I thought I would die….and it was Christmas to boot.
- I learned that using deeper ramekins requires a longer cooking time than the traditional oval shaped dishes. I was serving a party of 6 so I used regular round ramekins, which are deeper. I should have realized, but now I know. So here’s a tip: When you check for doneness, gently wiggle the ramekin and look for jelled consistency. Consider it done when it jiggles like jelly. I also use a finger-touch method to see if it feels set…just gently set to the touch yet still soft.
- Next tip…and one I used this year three times with equally good results. Vanilla Bean Paste instead of an actual vanilla bean. You know how much I love this stuff. It made for a very easy preparation, still had the vanilla beans showing in the custard, and the flavor was fantastic.
This recipe is dreamy good. The signature toasted sugar shell that tops this classic dessert melts in your mouth as the creamy vanilla custard coats your tongue in vanilla goodness.
This post is linked to Gluten Free Wednesdays
Ingredients
- 2 cups heavy cream
- 1/3 cup sugar
- 4 egg yolks
- ½ vanilla bean (preferred) or 1 Tbsp of vanilla bean paste
- Raw Sugar for top (Turbinado Sugar)
- Strawberries or raspberries for garnish
Preheat oven to 325 degrees. Slice vanilla bean in half. Remove the vanilla beans from the casing and add to a sauce pan. Add the 2 cups of cream to the sauce pan and scald the bean and cream…..(to 140 degrees). I whisked the cream and vanilla bean to combine as the little seeds seemed to clump together. You can also use 1 Tbsp vanilla bean paste instead of the vanilla bean.
Next, in a medium glass bowl, whisk the egg yolks with the sugar until mixed well together. Once the cream (low temp) has come to temp, temper the cream into the yolks by adding just a small amount to the yolks at a time, continuing to whisk so as not to cook the yolks. I did this for about 1 cup of the cream. Then you can add the cream all at once. Whisk to combine, but don’t add too much air.
With a fine mesh strainer, strain the mixture into another bowl to assure no lumps or residue. The little vanilla beans will run through the mesh and you want those!
- The next step is optional and traditional…although I’ve been skipping this step as I haven’t found removing the bubbles necessary. But it’s classic and ‘proper’ if you are into that stuff: Remove air bubbles with the blow torch brushed across the top of the mixture (see video) or remove bubbles with a ladle.
Prepare the pan: Put a wet towel (small dish towel) in the bottom of a dish large enough to hold the four ramekins. Place the empty ramekins on top of the towel in the pan. Fill ramekins almost to the top, distributing equally. Pour very hot tap water into the pan up to halfway of the ramekins creating a water bath.
Bake In a 325 degree oven for 30-35 min. Should jiggle like jelly, be slightly firm to the touch but still soft. Remove from oven and from the water bath onto a baking sheet or tray. Allow to cool for 10 minutes then put in refrigerator for at least 4 hours or overnight. They need this time to properly set into the custard texture.
- Tip: After a couple of hours I usually place a dry paper towel over the top of ramekins, lightly, just to prevent any food odors or flavors in refrigerator from wicking into the creme brulee.
When ready to serve, remove about 20-30 minutes prior to serving. Pour raw sugar on top and torch-burn the sugar with a blow torch…2-3 inches from the top. Wait a second or two and do again until little burn spots on top. Garnish with raspberries or strawberries on top. YUM!

